This guide is based on version:
| EVE Image Folderame | Downloaded Filename | Version | vCPUs | vRAM |
|---|---|---|---|---|
| vmxvcp-17.1R1.8-domestic-VCP | vmx-bundle 17.1R1.8.tgz | Junos:17.1R1.8 | 1 | 1 Gb |
| vmxvcp-17.1R1.8-domestic-VFP | vmx-bundle 17.1R1.8.tgz | Junos:17.1R1.8 | 3 | 4 GB |
| Instructions |
|---|
| This how to is tested for image versions 16.1, 16.2, 17.1, 18.2, 19.1, 20.1, 22,1 The NEW Juniper vMX images are based on dual nodes setup, where Routing engine (VCP) is connected to Forwarding plane (VFP) and act like single node. all cli configurations will be done on the VCP, but porting and connections will be on VFP.Create temporary working directory for images: mkdir abc
cd abc
Upload the downloaded image to the EVE using for example FileZilla or WinSCP. Then login as root using SSH protocol and uncompress it: Unzip loaded image archive: tar xvf vmx-bundle-17.1R1.8.tgz
cd vmx-17.1R1.8/images/
ls
junos-vmx-x86-64-17.1R1.8.qcow2 metadata-usb-fpc1.img metadata-usb-fpc6.img metadata-usb-re1.img
junos-vmx-x86-64-17.1R1.8.tgz metadata-usb-fpc2.img metadata-usb-fpc7.img metadata-usb-re.img
metadata-usb-fpc0.img metadata-usb-fpc3.img metadata-usb-fpc8.img vFPC-20170216.img
metadata-usb-fpc10.img metadata-usb-fpc4.img metadata-usb-fpc9.img vmxhdd.img
metadata-usb-fpc11.img metadata-usb-fpc5.img metadata-usb-re0.img
Our necessary images are marked in green above. 1. create VCP image folder: mkdir /opt/unetlab/addons/qemu/vmxvcp-17.1R1.8-domestic-VCP
2. copy images to VCP image folder: 2.1. virtioa.qcow2 cp junos-vmx-x86-64-17.1R1.8.qcow2 /opt/unetlab/addons/qemu/vmxvcp-17.1R1.8-domestic-VCP/virtioa.qcow2
2.2. virtiob.qcow2 cp vmxhdd.img /opt/unetlab/addons/qemu/vmxvcp-17.1R1.8-domestic-VCP/virtiob.qcow2
2.3. virtioc.qcow2 cp metadata-usb-re.img /opt/unetlab/addons/qemu/vmxvcp-17.1R1.8-domestic-VCP/virtioc.qcow2
3. create VFP image folder: mkdir /opt/unetlab/addons/qemu/vmxvfp-17.1R1.8-domestic-VFP
4. copy images to VFP image folder: 4.1. virtioa.qcow2 cp vFPC-20170216.img /opt/unetlab/addons/qemu/vmxvfp-17.1R1.8-domestic-VFP/virtioa.qcow2
5. Remove abc folder and fix permissions: cd
rm -rf /root/abc
/opt/unetlab/wrappers/unl_wrapper -a fixpermissions
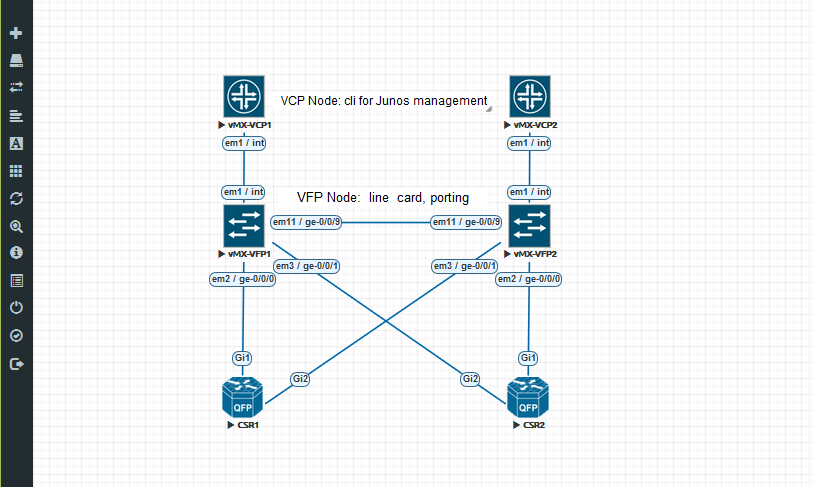
Add VCP and VFP nodes on the topology and connect them with em1 interfaces. em1 interface is communication port between VCP and VFP. This setup will be one vMX 17 node (set of 2). Use VFP to connect your lab element to the ports. Topology example: Start VCP and VFP set and wait till it is fully boots. Once VCP will be fully booted it will automatically start communicate with VFP. WAIT till on VFP cli appears that interfaces are UP. When VFP will say interfaces are UP, on the VCP appears ge-0/0/X interfaces and node is ready for work. Pic below:  Default username is admin without password. Max supported interfaces VCP-2, VFP-12 Configuration import/export is supported, just be sure that you are in “root@vMX-VCP-1:~ #” mode |

